Ever looked at a flat image and wondered what it would look like in 3D? Whether you’re a designer, a hobbyist, or just curious, learning how to convert 2D image to 3D model opens up a whole new world of creative possibilities. The good news? It’s easier than you might think—and in this guide, we’ll show you how to do it step by step.
Why convert 2D images to 3D models?
There are many reasons people want to transform 2D images into 3D. You might want to bring an old sketch to life, turn a photo into an interactive scene, or create digital artwork for 3D printing or AR visualization. Whatever your goal, the ability to convert images to 3D models gives your creative ideas a new dimension, literally.
And thanks to modern tools, you no longer need advanced modeling skills to do it.

What do you need to get started?
Getting started with RealityMAX’s image to 3D model feature is surprisingly simple. You don’t need complex software or modeling skills—just a few basics:
- A clear 2D image in JPG or PNG format
- A free RealityMAX account
- A web browser (RealityMAX runs entirely online)
- A few minutes to upload and explore your 3D result
That’s it. No downloads, no setup, no learning curve.
Once you upload your image, our AI takes care of the rest, generating a 3D model directly in your scene, ready to rotate, resize, or place inside your virtual layout.
Whether you’re on Windows, macOS, or even using a tablet, RealityMAX works smoothly right in your browser.

Step-by-step: How to convert 2D image to 3D model
With RealityMAX, turning a simple image into a 3D model is no longer a designer’s secret; anyone can do it in a few clicks. Here’s how it works:
1. Choose your 2D image wisely
Not every image will translate well into 3D. For the best results, start with a clean, clear visual. That means:
- A high-contrast image or grayscale sketch
- A simple background (or none at all)
- Visual cues that suggest depth, like shading or perspective
Example: A product photo taken from the side or a detailed line drawing works better than a noisy background or abstract pattern.
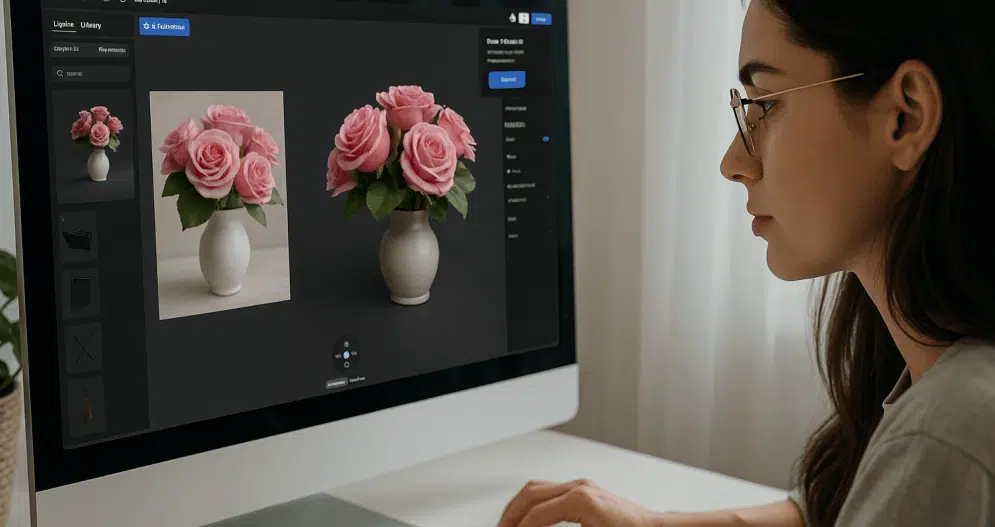
2. Upload the image using the AI tool in RealityMAX
Inside your RealityMAX scene, look for the “Image to 3D with AI” panel in the top-right corner. This popup lets you upload a 2D image directly into your project and instantly convert it into a 3D model.
Click “Upload image”, select your file (JPG or PNG), and the AI will get to work—no settings to configure, no complex steps. Within seconds, your new 3D object will appear in your scene, ready to move, scale, or style however you want.

3. Generate and preview the 3D model
In just a few seconds, you’ll see your image transformed into a 3D object, right inside your workspace. It appears as a fully interactive model, you can:
- Rotate, move, and scale
- Place anywhere in your scene
- Combine with other 3D elements or environments
It’s ready to explore from every angle; no extra tools or downloads needed.

4. Refine the result (if needed)
Once your 3D model appears in the scene, you can start shaping it to match your vision:
- Resize or reposition it in context
- Add lighting or shadows to make it pop
- Combine it with other assets to create full 3D compositions
- Apply materials and adjust the surface look
Want to take it even further? Use ReIMAGINE, our built-in AI image enhancer. This powerful tool lets you enrich your 3D model with textures, finishes, and photorealistic styling. In just a few clicks, you can transform a basic shape into a polished, presentation-ready asset.
The goal isn’t just to have a model—it’s to make it belong in your scene. And with RealityMAX + ReIMAGINE, that’s easier than ever.
5. Export and save your 3D file
Your model stays in your scene, ready to use, duplicate, or edit anytime. You can:
- Save your project in RealityMAX
- Export your model in formats like .GLB or .OBJ if needed
- Or share the scene with your team or client via a link
Everything happens right in the browser, so you can go from image to 3D in under a minute. No software, no delays.
Tips to improve the quality of your 3D model
Getting good results depends on more than just hitting “convert.” Here are some pro tips:
Use grayscale for depth accuracy
Tools often translate brightness into elevation. So grayscale images with strong contrast help define depth more clearly than colorful photos.
Clean up the background before uploading
If your image has distracting elements, remove them first. A simple black-and-white silhouette or drawing often converts better than a whole scene.
Preview before download
Don’t skip the preview. Rotate the model, zoom in, and view it from multiple angles. Make sure edges are clean and surfaces look intentional.
Consider scale and dimensions
Adjust the depth scale or extrusion setting if your model looks too stretched or squashed. Each image needs a different treatment.
What types of images work best?
Not sure where to start? Here are a few ideas to try:
- Line drawings – Great for architectural outlines or tattoo designs
- Photos of objects – Like a watch, bottle, or chair, taken from one side
- Logos and icons – Especially in SVG or black-and-white PNG format
- Portraits – Convert face photos into stylized 3D lithophanes
- Maps or terrain – Generate 3D elevation from top-down views
If you’re unsure, test a variety of images and see what works best for your goal.
Free tools vs paid platforms: What’s the difference?
If you’re experimenting, there are plenty of free tools online that can convert a 2D image to a 3D model. They’re fine for quick tests or simple visualizations, but they have limits.
Free converters usually give you:
- A low-res 3D model
- A static preview
- Basic shape generation
- Minimal or no post-editing options
That might be enough for a quick prototype or student project.
But if you’re looking for more, like cleaner geometry, faster rendering, better control, and a model that fits seamlessly into your workflow, that’s where platforms like RealityMAX come in.
With RealityMAX, you can:
- Instantly add the model to your live scene
- Adjust lighting, materials, and shadows
- Preview it in AR or full 3D environments
- Collaborate in real time, without switching tools
- Export in professional formats or keep working in-browser
No downloads. No plugins. Just a more innovative way to create 3D from images, with results that look polished and ready to use.

Real-world example: Turning a sketch into a product mockup
Let’s say you’ve drawn a side-view of a new shampoo bottle. You upload the sketch, adjust the depth, and apply some smoothing. Now you have a basic 3D shape.
In RealityMAX, you can go further:
- Add a color label
- Apply glass or plastic materials
- Place it in a bathroom scene
- Share the result with your team for feedback
All from one 2D image, in under five minutes.

What file formats should you save in?
If you plan to:
- Print your model → use STL
- View in AR or web → use GLB or USDZ
- Edit in modeling software → use OBJ or FBX
Always save a copy in the highest quality available. That way, you’ll be ready to rework or upscale it later.
How can you turn photos into accurate 3D scenes?
Traditional methods like photogrammetry require multiple images, special software, and a lot of patience. But with RealityMAX’s image to 3D model, you can skip the complexity and still get visually accurate 3D results directly from a single photo.
While this approach doesn’t reconstruct an entire environment with millimeter precision, it does something far more accessible: it gives you a realistic 3D object from a single 2D image, instantly placed in your scene. It’s fast, browser-based, and needs no depth maps or extra views.
Want to build full scenes? Just repeat the process with multiple images. You can:
- Upload individual products, objects, or artworks
- Arrange them freely inside your 3D workspace
- Add lighting, shadows, and surfaces to bring context and depth
- Even group items into sets or room layouts
So instead of needing dozens of camera angles, you can build custom 3D compositions from flat images, with AI doing the heavy lifting.
The result? A smart, accurate-looking scene in a fraction of the time, without leaving your browser.

Is there a way to preview your 3D model before downloading?
Absolutely, and in RealityMAX, you don’t just preview your model, you interact with it right away.
The moment your image is converted, the 3D model appears live in your scene. There are no loading screens or pop-ups. Just drag to rotate, zoom in, reposition, or change the lighting in real time.
You can:
- View the model in full 360°
- See how it behaves in different lighting setups
- Apply materials, adjust size, or position it within other elements
- Keep tweaking it without ever needing to download a file
And if you do want to export it later, you can. But with RealityMAX, the idea is simple: you shouldn’t need to leave the platform to see if it works. You see the result immediately, exactly how it’ll look in your project.

Can 2D to 3D tools work for artistic projects?
Absolutely. Many artists use these tools to:
- Transform flat illustrations into sculptures
- Add dimension to digital paintings
- Create physical versions of digital art
- Design immersive scenes from single-frame concepts
The key is letting creativity lead. The tech is just the bridge.

What’s the easiest way to get started?
The fastest way to try RealityMAX’s image to 3D model feature? Just open your scene and look at the top-right corner.
Here’s how to do it:
- Click on the “Image to 3D with AI” panel in the top-right corner of your scene
- Hit “Upload image”
- Choose any photo, sketch, or concept art from your computer
- Let the AI generate the 3D model automatically right in your scene
- Position, rotate, or edit the model just like any other object in RealityMAX
That’s it. You don’t need to adjust depth, export anything, or open other apps.
The best part? It works directly in your browser. No installs, no downloads: just click, upload, and watch your image come to life in 3D.
Ready to see it for yourself?
Start with any image and give it volume, context, and impact with RealityMAX.
